Many assume that robotic mower charging issues are complex or rare, but often, simple troubleshooting steps resolve the problem. We recognize that identifying the root cause can seem intimidating, yet systematic checks reveal common electrical or alignment faults. By carefully inspecting power connections, docking accuracy, and station reset procedures, we can restore functionality efficiently. Stay with us as we outline essential steps to troubleshoot these issues effectively and avoid unnecessary replacements.
Key Takeaways
- Check power supply, outlets, and circuit breakers for consistent electrical flow to the station.
- Clean and inspect docking contacts and sensors for corrosion or debris.
- Verify proper mower alignment and unobstructed docking area.
- Reset the station by unplugging, waiting, and rebooting to resolve temporary glitches.
- Contact support or replace damaged components if troubleshooting steps do not resolve the issue.
How Do I Identify Common Charging Station Issues?
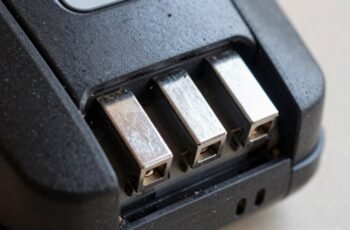
To effectively troubleshoot a robotic mower’s charging station, we first need to identify the most common issues that can cause malfunctions. Typically, these problems include power supply failures, damaged or dirty charging contacts, and misalignment of the mower on the docking station. Power issues often stem from faulty wiring, blown fuses, or interrupted circuits. Charging contact corrosion or debris can impede electrical connectivity, preventing proper charging. Misalignment occurs when the mower fails to dock correctly, which can be caused by physical obstructions or worn docking components. We should also verify that the charging station is receiving consistent power and inspect for any physical damage. Recognizing these issues allows us to target our troubleshooting efforts efficiently and determine whether repairs or replacements are necessary.
How Can I Check the Mower’s Docking and Alignment?
Ensuring proper docking and alignment is essential for the robotic mower to charge effectively. To verify this, we recommend the following steps:
- Inspect the docking station’s sensors for cleanliness and unobstructed view; dirt or debris can impair sensor function.
- Check the alignment of the charging contacts on both the mower and station; they must be directly aligned and free of corrosion.
- Position the mower accurately within the designated docking area, ensuring it aligns with the station’s guiding signals.
- Review the station’s guiding beacons or boundary wires for correct placement and integrity, preventing misalignment during docking.
These precise checks help maintain ideal docking accuracy and charging efficiency.
What Are the Key Steps to Reset or Reboot the Charging Station?
When troubleshooting charging issues, resetting or rebooting the station often resolves temporary glitches. To reset the charging station, first unplug the power supply from the electrical outlet. Wait at least 30 seconds to ensure all internal circuits discharge. Reconnect the power cord securely, then power on the station if it has a power button. For stations with a reset button, press and hold it for 10 seconds to initiate a reset. Rebooting involves cycling power to the station, which can be done by unplugging and then replugging the power supply. Confirm that the station’s indicator lights reset to their default states, indicating a successful reset or reboot. This process clears minor software errors and restores the station’s normal operation, facilitating further troubleshooting if issues persist.
How Do I Troubleshoot Power and Connection Problems?
After resetting or rebooting the charging station, power and connection issues can still prevent the robotic mower from charging properly. To troubleshoot effectively, follow these steps:
- Verify power supply: Ensure the station is plugged into a functioning outlet with no tripped circuit breakers.
- Inspect power cables: Check for loose or damaged cables, ensuring secure connections at both the power source and station.
- Examine connection points: Confirm that contact points between the mower and charging station are clean, free of debris, and properly aligned.
- Test electrical continuity: Use a multimeter to verify voltage at the station’s power input and output terminals, ensuring proper electrical flow.
Implementing these steps isolates power and connection issues, enabling precise troubleshooting.
When Should I Contact Support or Consider Replacing Parts?
If troubleshooting power and connection issues doesn’t resolve the problem, it’s time to contact support or consider replacing parts. Persistent failures after thorough diagnostics indicate potential hardware faults or component deterioration. Signs include recurring charging failures, abnormal error codes, or physical damage to the station. When evaluating whether to replace parts, consider the following:
| Condition | Recommended Action |
|---|---|
| Repeated charging failures | Contact support or substitute the charging port |
| Visible damage or corrosion | Replace affected components |
| Error codes indicating hardware faults | Seek professional assessment |
| Station performance decline over time | Consider part replacement or upgrade |
Proactive assessment prevents further damage and ensures reliable operation.
Frequently Asked Questions
How Often Should I Perform Maintenance on the Charging Station?
We recommend inspecting and cleaning the charging station monthly, checking for debris or corrosion, ensuring proper connections, and testing functionality regularly. Consistent maintenance guarantees peak performance, prolongs lifespan, and prevents potential malfunctions of your robotic mower’s charging station.
Can Weather Conditions Affect the Charging Station’s Performance?
Weather conditions can considerably affect the charging station’s performance; extreme temperatures, moisture, and snow may cause electrical issues or corrosion. We recommend installing the station in a sheltered, dry location and regularly inspecting it for weather-related damage.
Are There Specific Tools Needed for Troubleshooting?
We typically need a multimeter to check voltage, a screwdriver for securing connections, and a cleaning brush to remove debris. These tools help us diagnose issues efficiently, ensuring the charging station functions correctly and maintains peak performance.
How Do I Update the Firmware of the Charging Station?
We update the firmware via the manufacturer’s app or software, connecting the station to Wi-Fi, then following on-screen instructions to check for updates and install them securely, ensuring ideal charging station performance and compatibility.
What Safety Precautions Should I Follow During Troubleshooting?
We prioritize safety like a lighthouse guiding ships; always disconnect power, wear insulated gloves, avoid water exposure, and follow manufacturer instructions meticulously to prevent electrical hazards during troubleshooting. Stay alert, and proceed with caution and precision.
Conclusion
By systematically troubleshooting, we often uncover that small issues—like loose wires or dirty contacts—are the culprits. Sometimes, a simple reset aligns everything, much like how a minor software update can resolve unexpected glitches. When these steps don’t work, it’s a reminder that even advanced technology benefits from expert support. In the end, diligent inspection and timely action keep our robotic mowers running smoothly, ensuring we’re always prepared for those perfect, effortless lawns.